We need to specify a test plan to manufacture a board. In order to encourage designing and manufacturing by yourselves, we show our test plan for Flying Stone Tiny 01SZ here.
This makes the reproducibility better, I suppose.
In my opinion, free hardware design should have a test plan to guarantee (or at least, to help) the reproducibil9ity of hardware, which means better controling our computing.
Since our point is the users' computing freedom, we specifically use a special tool named BBG-SWD as a SWD debugger. BBG-SWD stands for "BeagleBone Green for SWD access", and originally uses BeagleBone Green.
BBG-SWD is BeagleBone Green, physically or hardware-wise. Software-wise, it's a patched version of OpenOCD. We control its GPIO pins for SWD signals. Following explanation assumes use of BBG-SWD.
It is also possible to use PocketBeagle for BBG-SWD, if it's only flashing FST-01SZ. Since this test plan includes testing FST-01SZ after flashing, we use BeagleBone Green.
NOTE: You can use a vendor supplied (proprietary) tool for SWD debugger like ST-Link/V2, if you want.
Introduction
FST-01SZ (Flying Stone Tiny 01SZ) is a small USB computer with a MCU.
The intended use of FST-01SZ is for cryptographic operations, like Gnuk or NeuG.
FST-01SZ uses GD32F103TB as MCU. It runs at 108MHz (by 12MHz XTAL), and the architecture is a version of ARM, Cortex-M3.
It has a hall sensor to use a magnet as acknowledge/confirmation user interface. It has a LED to notify a user. It has a USB port to connect the device to host PC. Since power is supplied through USB, it has a LDO to convert 5V to 3.3V for the MCU. It has a SWD port to flash the MCU.
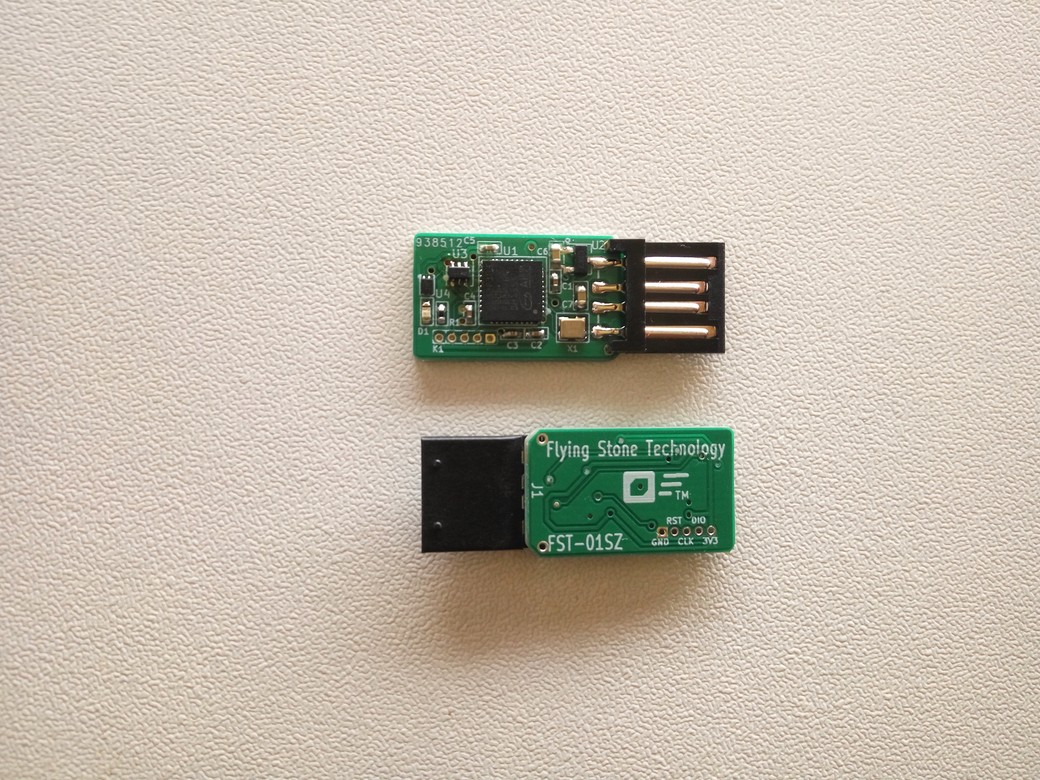
Here is FST-01SZ figure.
Top View of FST-01SZ:

          +-----------------\==-------+
          |     +---+ [LDO] =||====== |
Sensor -> |[]   |MCU|       =||=====  |
  LED  -> |[]   +---+       =||=====  |USB port
          |  ooooo    [XTL] =||====== |
          +-----------------/==-------+
             ^^^^^
             ||||| SWD port
            / ||| \
           /  |||  \
          /  / | \  \
        3V3 /  |  \ GND
            |  |  |
          DIO  |  RST
               |
              CLK
Basically, the test plan tests all components of the board.
In this test plan, power is supplied through USB port, so that we can test the LDO. Thus, we don't connect 3V3 pin of SWD port. This 3V3 pin is only an exception which is not tested if it works well or not.
Here is FST-01SZ photo.
Test Theory
With the SWD debugger (BBG-SWD), we flash the firmware into MCU. We use command-line (CLI) utility, that is, OpenOCD patched for BBG-SWD.
The firmware to be written is NeuG, the true random generator. The filename of our firmware file is: neug-fst-01sz-20181121.elf
We invoke the command from the command line shell. When executed, the utility control the SWD signals to flash into MCU.
After successful invocation of OpenOCD, the program runs on the board. FST-01SZ works as a USB Mass Storage Device, at start. LED should emit light at this point.
Then, we run a script to see if USB works well. It asks to move a magnet closer to the board, and remove it. If it works well, we see the output: SUCCESS. Otherwise, we see FAILURE with a reason.
After running a script, LED of FST-01SZ blinks.
Test Tools
Hardware:
- PC with Ethernet
- BeagleBone Green (BBG) with microSD
- USB Cable (to supply power to BBG, only power lines, no signal lines are needed)
- USB Cable (from BBG to FST-01SZ)
- SWD wires to connect the board to BBG
- Ethernet cable
- Ethernet hub
- Magnet
Software:
- Operating System on BBG: Debian GNU/Linux
- OpenOCD patched for BBG-SWD (installed as /usr/local/bin/openocd)
- a script checking USB of FST-01SZ: check-fst-01sz.sh
Firmware: * NeuG: neug-fst-01sz-20181121.elf
Preparation
Network Connection
PC and BBG is connected by Ethernet.
[Router]
  |
[ Ethernet Hub ]
  |       |
[PC]     [BBG]
Router offers IP addresses to PC and BBG by DHCP.
Please look the router configuration for the IP address of BBG.
BBG connections
Here is a figure of BBG.
Top View of BeagleBone Green (BBG):

  /-[=================]----\
  |                       +-+ USB cable +----------+
  |                       +-+===========| FST-01SZ |
  []     BeagleBone        |            +----------+
  |         Green        +--+
  []                     |  |=============> Ethernet
  |                      +--+
  |                        |==============> USB Power
  \-[=================]----/
             | | | |
             | | | |
  GREEN (RST)V | | |
               V | | Wires to FST-01SZ SWD port
  BLACK (SWD-IO) | |
                 V |
   WHITE (SWD-CLK) V
                   BLUE (GND)
Power is supplied by USB to BBG (USB Power).
USB cable is connected from BBG to FST-01SZ.
Four wires are connected from BBG GPIO port to FST-01SZ SWD port.
Pins for SWD access
We use four lines from BBG for SWD control.
| GND | P8_02 | BLUE |
| SWD-IO | P8_11 | BLACK |
| SWD-CLK | P8_12 | WHITE |
| SRST | P8_15 | GREEN |
Booting
Put the microSD to BBG, connect ethernet cable and USB power cable. By power, BBG starts running. It takes 30 seconds to 60 seconds to boot up.
SSH login to BBG
Log into BBG from PC by SSH. The username is "debian". Since the password is displayed when you connect to BBG, use the password.
It's like:
$ ssh debian@192.168.2.108
Firmware ELF file
There is a file, neug-fst-01sz-20181121.elf.
OpenOCD patched for BBG-SWD
OpenOCD is installed in /usr/local.
Test Procedure
Check if SWD port is ready
Execute the following command to check the port is ready to use:
$ cat /sys/devices/platform/bone_capemgr/slots
Expected output of the command
When it is ready to use, output is something like:
0: PF----  -1
1: PF----  -1
2: PF----  -1
3: PF----  -1
4: P-O-L-   0 Override Board Name,00A0,Override Manuf,uio_pruss_enable
It should show the string of "uio_pruss_enable" at the last line.
You only need to run this command only at the first time.
Execution of OpenOCD to flash and test the board
Execute the openocd command:
$ openocd -f bbg-fst-01sz.cfg -f fst-01sz-flash-write.tcl
Expected behavior of the board and expected output of the command
Successfully done, output is something like:
Open On-Chip Debugger 0.10.0-snapshot (2018-11-21-09:42)
Licensed under GNU GPL v2
For bug reports, read
    http://openocd.org/doc/doxygen/bugs.html
Info : only one transport option; autoselect 'swd'
adapter speed: 1000 kHz
adapter_nsrst_delay: 100
none separate
cortex_m reset_config sysresetreq
srst_only separate srst_nogate srst_open_drain connect_assert_srst
Info : Connecting under reset
Info : BBG-SWD: Interface ready
Info : clock speed 1000 kHz
Info : SWD DPIDR 0x1ba01477
Info : stm32f1x.cpu: hardware has 6 breakpoints, 4 watchpoints
Info : SWD DPIDR 0x1ba01477
target halted due to debug-request, current mode: Thread
xPSR: 0x01000000 pc: 0xfffffffe msp: 0xfffffffc
Info : device id = 0x13030410
Info : flash size = 128kbytes
Option Byte: 0x3fffffc
Readout Protection Off
Software Watchdog
Stop: No reset generated
Standby: No reset generated
User Option0: 0xff
User Option1: 0xff
Info : SWD DPIDR 0x1ba01477
target halted due to debug-request, current mode: Thread
xPSR: 0x01000000 pc: 0xfffffffe msp: 0xfffffffc
** Programming Started **
auto erase enabled
wrote 84992 bytes from file neug-fst-01sz-20181121.elf in 10.300669s (8.058 KiB/s)
** Programming Finished **
** Verify Started **
verified 84004 bytes in 2.132703s (38.465 KiB/s)
** Verified OK **
** Resetting Target **
shutdown command invoked
The line "wrote 84992 bytes from file neug-fst-01sz-20181121.elf" means success. When failure, you won't be able to see this line.
After successful programming of flash, the LED on FST-01SZ emits light continuously.
Execute the checking script:
$ ./check-fst-01sz.sh
After checking files on FST-01SZ, it prompts you to put a magnet to the hall sensor closely and to remove. You should do that within ten seconds.
Expected behavior of the board and expected output of the script
Successfully done, output is:
/mnt/COPYING: OK
/mnt/INDEX.HTM: OK
/mnt/README: OK
Please put a magnet close to the hall sensor, then, remove it
Waiting (up to 10 seconds): .......
SUCCESS
This means that these files on FST-01SZ are correct.
LED blinks after this command.
To repeat writing and checking for another board of FST-01SZ, you can use command line history of BASH; You can use arrow key UP (↑) to repeat same command line.
Test Result
Please record the test results:
- Success/failure of OpenOCD command.
- LED behavior: if it emits light or not.
- Success/failure of the checking script.
Those three should be successful.
Shut down the BBG
After testing FST-01SZ boards, to power down BBG, please type following command.
$ sudo shutdown -h now
Example connection
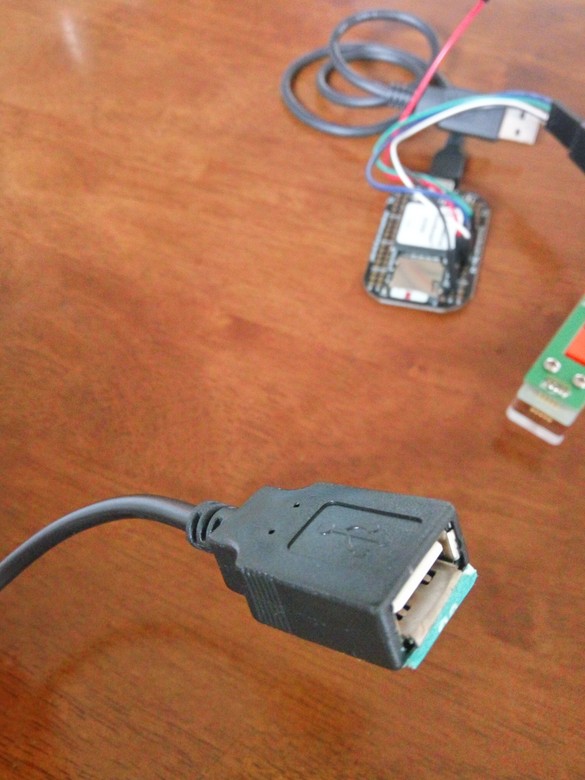
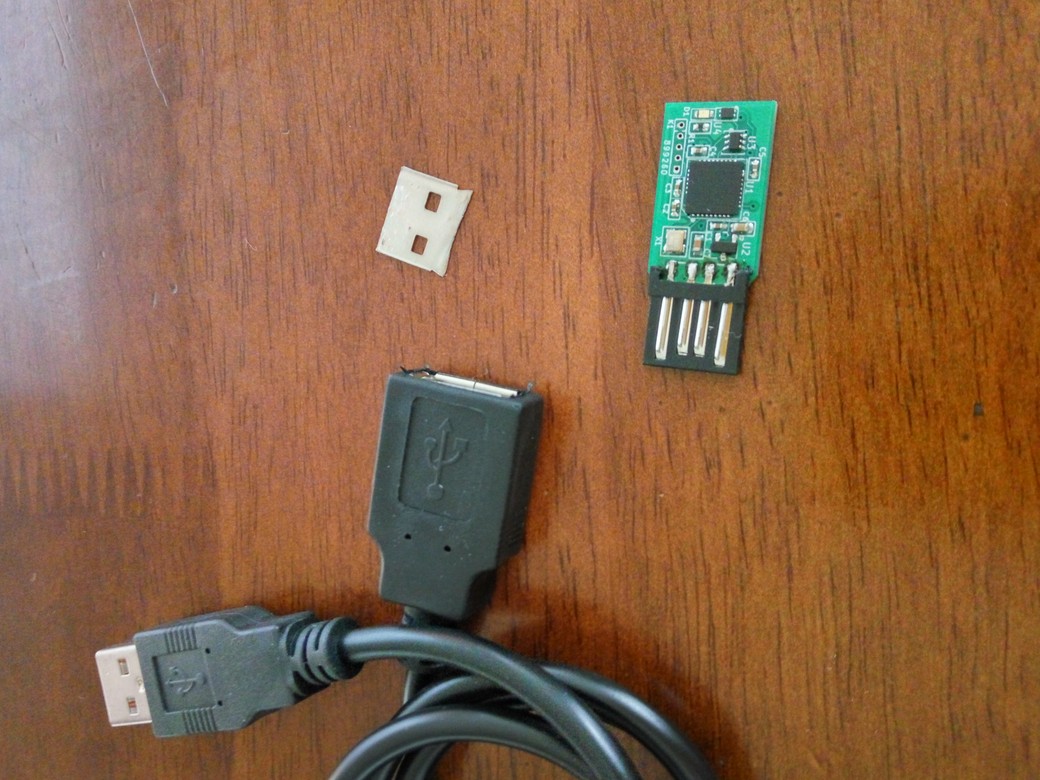
Here are photos of example connection.
Two photos of whole things.
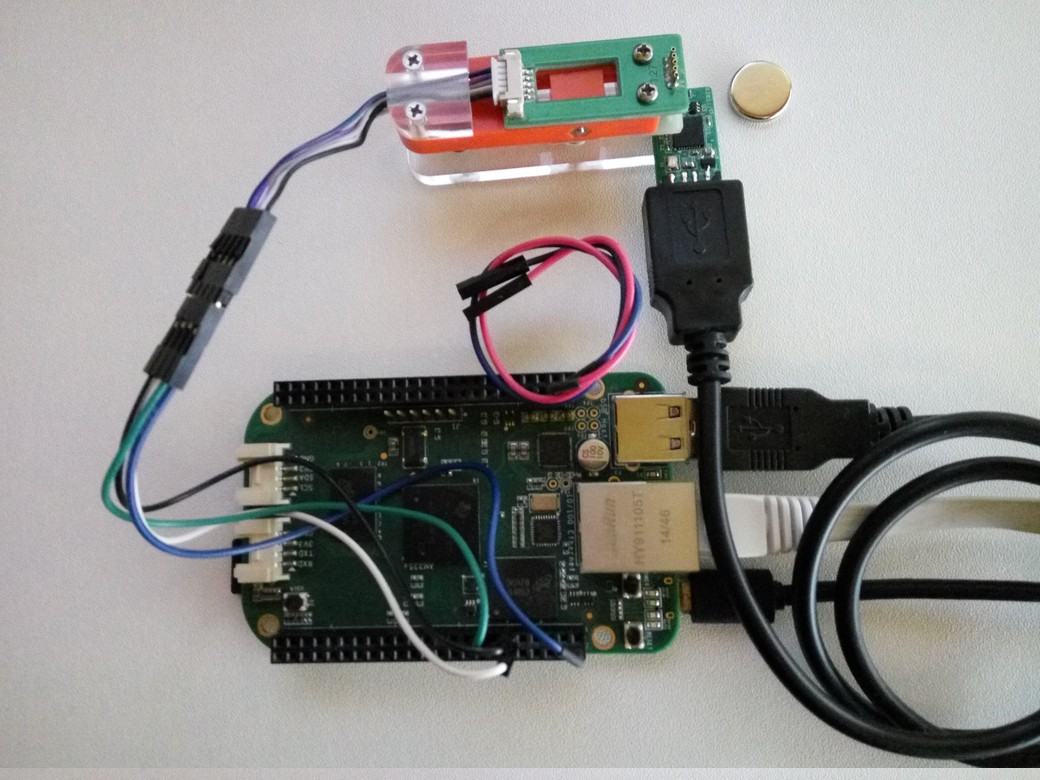
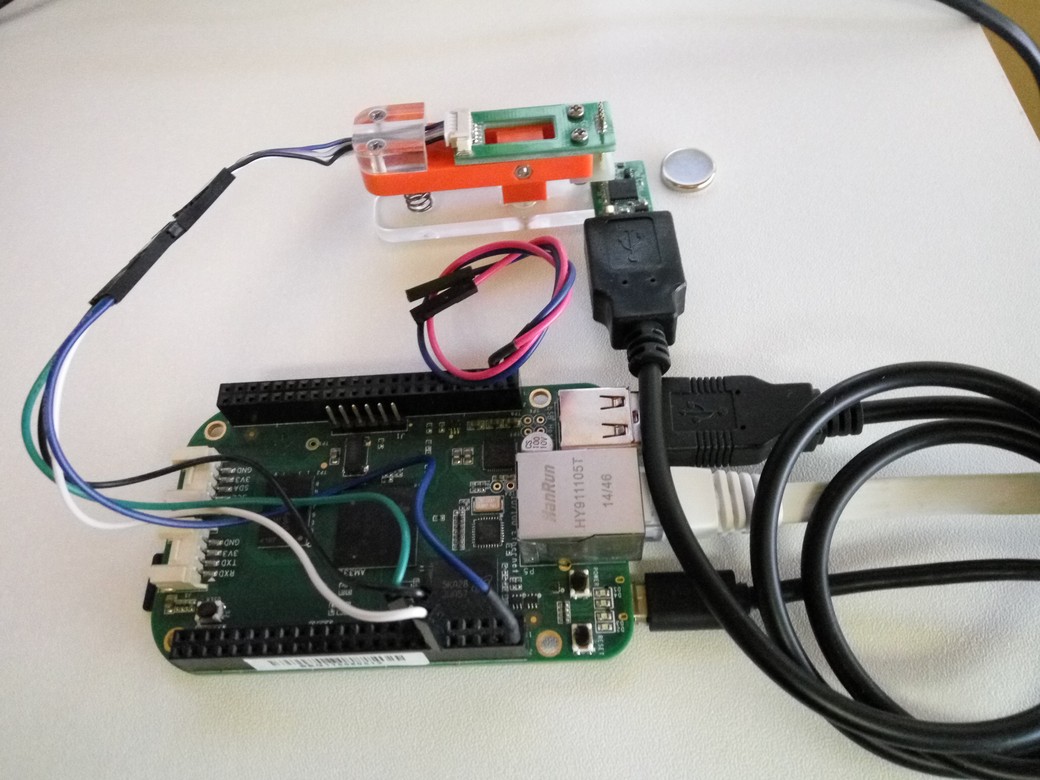
Showing BeagleBone Green and its GPIO pins.

Showing two photos for SWD port of FST-01SZ and a magnet. Note that I use special 1.27mm pitch connector (orange one).
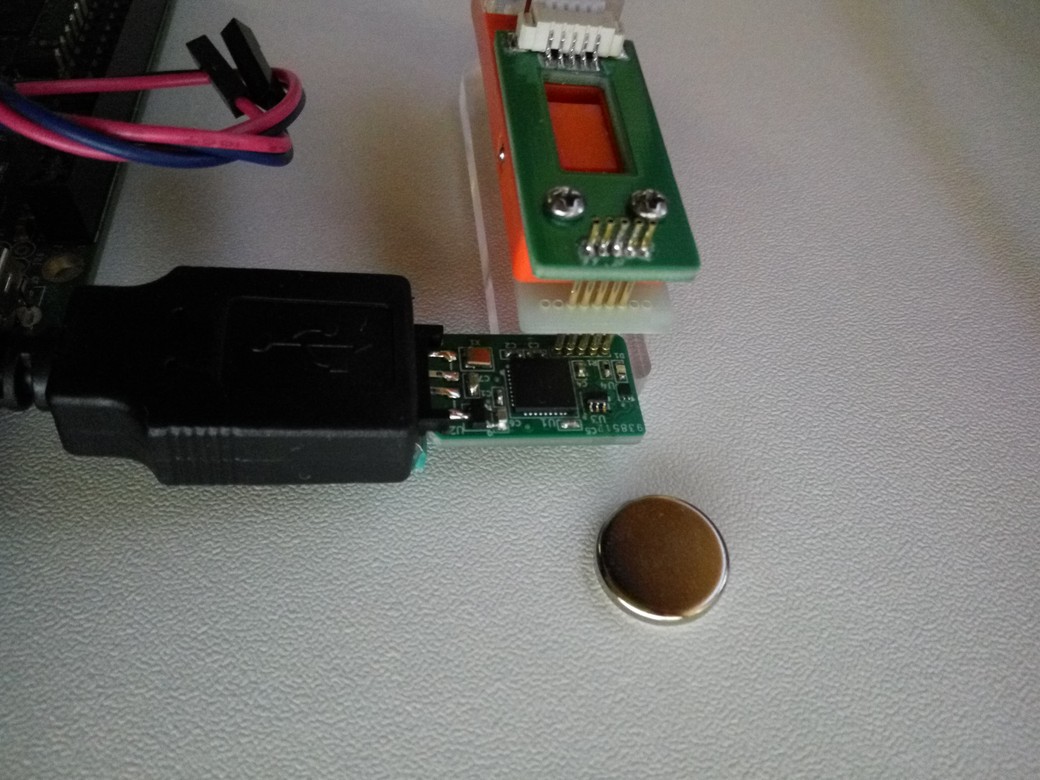

Showing USB connector from BBG to FST-01SZ. Since FST-01SZ is designed to be enclosed by a metal enclosure of ZL-271, I need to put a small thin plate into the USB connector.
Output of example session
Here is a example session:
gniibe@iwagami:~$ ssh debian@192.168.2.108
Debian GNU/Linux 9

BeagleBoard.org Debian Image 2018-01-28

Support/FAQ: http://elinux.org/Beagleboard:BeagleBoneBlack_Debian

default username:password is [debian:temppwd]

debian@192.168.2.108's password:
Linux beaglebone 4.9.119-bone11 #1 PREEMPT Fri Aug 17 08:24:21 UTC 2018 armv7l

The programs included with the Debian GNU/Linux system are free software;
the exact distribution terms for each program are described in the
individual files in /usr/share/doc/*/copyright.

Debian GNU/Linux comes with ABSOLUTELY NO WARRANTY, to the extent
permitted by applicable law.
Last login: Thu Nov 22 03:07:12 2018 from 192.168.2.102
debian@beaglebone:~$ cat /sys/devices/platform/bone_capemgr/slots
 0: PF----  -1
 1: PF----  -1
 2: PF----  -1
 3: PF----  -1
 4: P-O-L-   0 Override Board Name,00A0,Override Manuf,uio_pruss_enable
debian@beaglebone:~$ openocd -f bbg-fst-01sz.cfg -f fst-01sz-flash-write.tcl
Open On-Chip Debugger 0.10.0-snapshot (2018-11-21-09:42)
Licensed under GNU GPL v2
For bug reports, read
    http://openocd.org/doc/doxygen/bugs.html
Info : only one transport option; autoselect 'swd'
adapter speed: 1000 kHz
adapter_nsrst_delay: 100
none separate
cortex_m reset_config sysresetreq
srst_only separate srst_nogate srst_open_drain connect_assert_srst
Info : Connecting under reset
Info : BBG-SWD: Interface ready
Info : clock speed 1000 kHz
Info : SWD DPIDR 0x1ba01477
Info : stm32f1x.cpu: hardware has 6 breakpoints, 4 watchpoints
Info : SWD DPIDR 0x1ba01477
target halted due to debug-request, current mode: Thread
xPSR: 0x01000000 pc: 0xfffffffe msp: 0xfffffffc
Info : device id = 0x13030410
Info : flash size = 128kbytes
Option Byte: 0x3fffffc
Readout Protection Off
Software Watchdog
Stop: No reset generated
Standby: No reset generated
User Option0: 0xff
User Option1: 0xff
Info : SWD DPIDR 0x1ba01477
target halted due to debug-request, current mode: Thread
xPSR: 0x01000000 pc: 0xfffffffe msp: 0xfffffffc
** Programming Started **
auto erase enabled
wrote 84992 bytes from file neug-fst-01sz-20181121.elf in 10.300669s (8.058 KiB/s)
** Programming Finished **
** Verify Started **
verified 84004 bytes in 2.132703s (38.465 KiB/s)
** Verified OK **
** Resetting Target **
shutdown command invoked
debian@beaglebone:~$ ./check-fst-01sz.sh
/mnt/COPYING: OK
/mnt/INDEX.HTM: OK
/mnt/README: OK
Please put a magnet close to the hall sensor, then, remove it
Waiting (up to 10 seconds): .......
SUCCESS
debian@beaglebone:~$ sudo shutdown -h now
Connection to 192.168.2.108 closed.
More information about BBG-SWD
The version in use is BBG-SWD 0.04. The source code is available at: https://git.gniibe.org/cgit/bbg-swd.git/
The patch for OpenOCD is against version 0.10.0.
The root file system is based on Debian Stretch. /ID.txt says:
BeagleBoard.org Debian Image 2018-01-28
The kernel in use is 4.9.119-bone11. For BBG-SWD, "ti-rt" kernel does not work well because PRUSS support is different in this kernel.
The program for PRUSS is in:
/usr/local/share/openocd/bbg-swd/pru-swd.bin
Its source code is available in BBG-SWD repo.
More Information
check-fst-01sz.sh
The content is:
#! /bin/bash

if ! mount /mnt; then
   echo "FAILURE (USB Mass Storage mount)"
   exit 1
fi
if sha256sum -c <<EOF; then
8ceb4b9ee5adedde47b31e975c1d90c73ad27b6b165a1dcd80c7c545eb65b903  /mnt/COPYING
fda879e88be4a66495bc4390e98fdd30b1e3fb03ecd8f75c134845748cbba242  /mnt/INDEX.HTM
11098e530e7b789cde7c641c0cec8b4ae90c866aa0ed5b81e7bdf3f2db04f09b  /mnt/README
EOF
  echo "Please put a magnet close to the hall sensor, then, remove it"
  echo -n "Waiting (up to 10 seconds): "
  for i in $(seq 10); do
    if test -f /mnt/README; then
    echo -n "."
    sleep 1
    else
    break
    fi
  done
  echo
  if test -f /mnt/README; then
      echo "FAILURE (hall sensor)"
  else
      echo SUCCESS
  fi
else
  echo "FAILURE (USB Mass Storage files)"
  exit 1
fi
bbg-fst-01sz.cfg
The content is:
interface bbg-swd
source [find target/stm32f1x.cfg]
reset_config srst_only srst_nogate connect_assert_srst
fst-01sz-flash-write.tcl
The content is:
init
reset halt

stm32f1x options_read 0

program neug-fst-01sz-20181121.elf verify reset exit
/etc/fstab
For this test procedure, I added following line into /etc/fstab:
/dev/sda /mnt vfat user,noauto,ro 0 0
So that the USB Mass Storage can be mounted without root privilege.
/etc/network/interfaces
In the configuration file of /etc/network/interfaces, I configured the ethernet as:
auto eth0
iface eth0 inet dhcp
If static address configuration is preferred, you can change this like:
iface eth0 inet static
    address 192.168.8.2
    netmask 255.255.255.0
    network 192.168.8.0
    gateway 192.168.8.1
And modify /etc/resolv.conf to specify correct nameserver.
/opt/scripts/boot/am335x_evm.sh
Under /opt/scripts/, I modify the boot/am335x_evm.sh script. Most importantly, I added following like:
/usr/bin/config-pin overlay uio_pruss_enable
So that we cau use PRUSS feature of BBG for SWD access.
You can see the change by git diff command in /opt/scripts.
FST-01SZ flashed with NeuG 1.0.9
Note that the flash ROM is not protected by this test plan, so that an enduser can check the content of the flash ROM.
Other Tips
Resetting FST-01SZ
In the test procedure, at the check script step, it may be possible to encounter a failure when it takes more than ten seconds to move a magnet.
In this case, please type following command to reset FST-01SZ:
$ openocd -f bbg-fst-01sz.cfg -c "init" -c "reset run" -c "shutdown"
and then, try again with the check script.
Erase flash of FST-01SZ
In the test procedure, at the flashing FST-01SZ step, it might be possible to flash wrong image to FST-01SZ accidentally.
In this case, please type following commands to erase flash of FST-01SZ:
$ openocd -f bbg-fst-01sz.cfg -c "init" -c "reset halt" -c "flash erase_address 0x801000 0x10000" -c "shutdown"
$ openocd -f bbg-fst-01sz.cfg -c "init" -c "reset halt" -c "flash erase_address 0x800000 0x10000" -c "shutdown"
And then, try flashing with correct image.
We do by these two commands, because of GD32F103 while we can do that for STM32F103 in a single step. It's the difference of flash ROM implementation between GD32F103 and STM32F103. Future version of OpenOCD may support GD32F103 better, hopefully.
Locking flash access by SWD
In the test procedure, flash is not protected. If you need, you can do by following command.
$ openocd -f bbg-fst-01sz.cfg -c "init" -c "reset halt" -c "stm32f1x lock 0" -c "shutdown"
Unocking flash access by SWD
When GD32F103 is shipped from a factory, it should have empty unlocked flash. If it is accidentaly locked for some reason, you can unlock it by following command.
$ openocd -f bbg-fst-01sz.cfg -c "init" -c "reset halt" -c "stm32f1x unlock 0" -c "shutdown"
And then, remove off the FST-01SZ from the USB connector and then insert it the USB connector again, to power off -> power on GD32F103.